22B Replica Grill Installation
 |
A quick page detailing the solution I used to attach the 22B replica grill to my 2.5RS. It will involve purchasing a few bits of hardware and a small bit of drilling, but the end result is a very sturdy installation. Keep in mind, I'm documenting this modification after the fact, but you should have a good idea of what I did. Please feel free to email and ask any questions. Comments are always welcome. |
 |
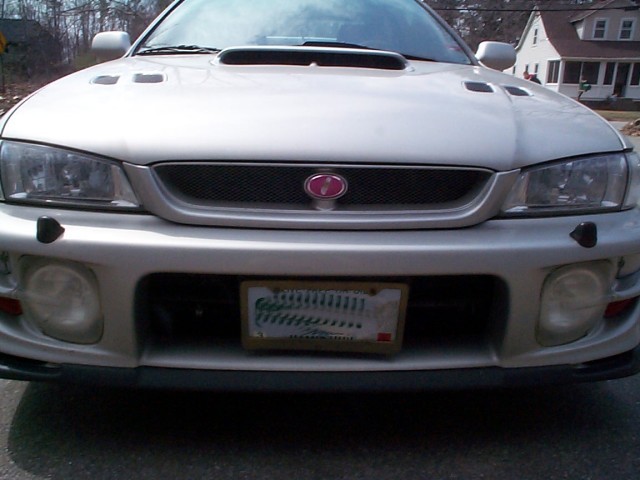
First thing to do is to remove the stock grill (if you need some quick instructions on how to do that, please visit the mods page on the Lighted Grill Badge). After the grill is removed, you will need to remove two pieces from it for use on the replica grill. At the very top in the center are two black rubber bumpers that look a bit like a hat. Pull them off, as the 22B replica grill does not have them and will need them. I simply used a bit of marine silicone to attach them to the replica grill- they go in the same location on the replica as they were on the stock grill, as seen below. |

|
Next thing to do is replicate the "pins" that hold the bottom of the stock grill in. I've heard people simply using a bolt and a nut to do this, but when I tried it the grill had a tendency to move around too much for my happiness. I found that if I used some panel attachment plugs (readily available from your Subaru dealer) they held the replica grill firmly. I simply put a small washer down on the grill, put a large headed screw through the washer and grill, and into the top of the panel plug, as seen below. |

|
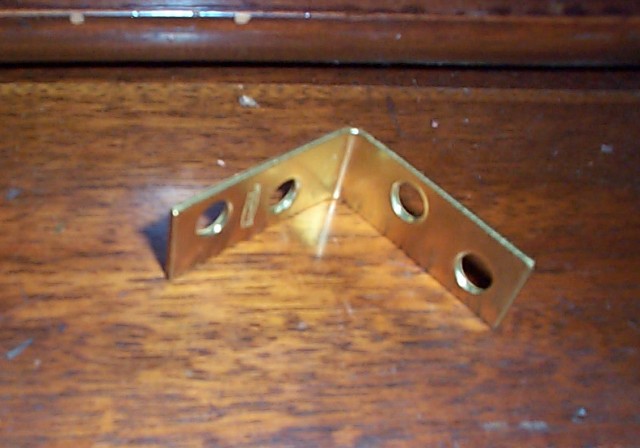
With that, the grill is prepared for installation. Now we need to take care of attaching it firmly to the body of the car. In the picture below, you can see the angle bracket that is the major structural tie to the car body for the grill. They came in a package of four (you only need two) and I recommend brass or stainless steel as they will not corrode. The size you are looking for has 1.5 inches long "legs" and would be 5/8" wide. I tried a few types, and this particular angle bracket had holes in the right places so you do not need to drill any in the bracket. |
|
Now the fun part- you get to use power tools! With the stock grill off, you can see where the "clips" that held the top of the stock grill to the car attached (I marked it with a red dot in the picture below). Since the stock "clip" hardware will not fit due to the construction of the replica grill, the angle bracket will take its place. |

|
Place the angle bracket behind this plastic piece (as seen below), and center the hole closest to you on the square hole where the stock grill used to attach. Mark the two holes with a permanent marker, so you can predrill holes for the sheet metal screws. With the holes drilled, you can then screw the bracket down to the car body. Repeat for the other side. |

|
With that done, it is simply a matter of placing the replica grill on the car in the reverse order you removed the stock one; place the bottom "plugs" in first, then tip the top back away from you while pushing down a little. It should fit very snugly. With that done, simply push two long bolts (I used phillips topped machine bolts instead of something like carriage bolts) down from the top, through the hole in the angle bracket. The threads on the bolt will grip against the sides of the hole in the angle bracket and will hold the grill firmly enough that you will need a screwdriver to be able to back them out. If not, remove the grill and bend the angle bracket forward or back a little until it holds the grill firmly (the hood, when closed, will be more than enough to keep the grill on, but this last small step insures it will not move). With that done, step back and enjoy! |