Painting Dashboard
 |
This is an easy mod to do, you just have to be a little careful. I would recommend printing this page out and bringing it out to the car with you, just so you can keep track of what you are doing. Make sure you have enough time- don't rush this, because you have to look at the dash every time you get in the car. When painting, you will need two or three coats, and about an hour between coats for proper drying time. It wouldn't be a bad idea to remove the gauge face, reassemble the dash, and do the painting when you have time, putting the face back in at a later date. The more time and patience you have, the better this will look! If you have any questions, please feel free to email me and ask. |
 |
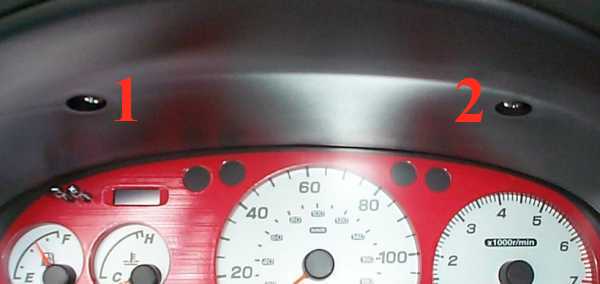
Ok, this is where it all begins! Start by lowering your steering wheel all the way (this will make enough room to work). Also, periodically check the parking light switch on the top of the steering column to make sure it is off. You will be bumping this switch frequently, and I don't want anyone draining their battery. OK, if you look, your outer dash cowl has two phillips screws holding the top in (labelled 1 and 2). Undo these two screws first. |

|
The bottom is held in by two "clips," much like those from the front grill (see the grillmod for another easy mod). The approximate locations of these clips is marked 1 and 2 in the picture above, while the picture below shows the clips and their location from the back of the outer cowl. Gently pull towards you in the areas marked 1 and 2, and it will pop right out. There is a small white wire in the picture below. You will not see that wire attached to the outer cowl on your car, so don't panic. It is from the valet switch to my alarm. |

|
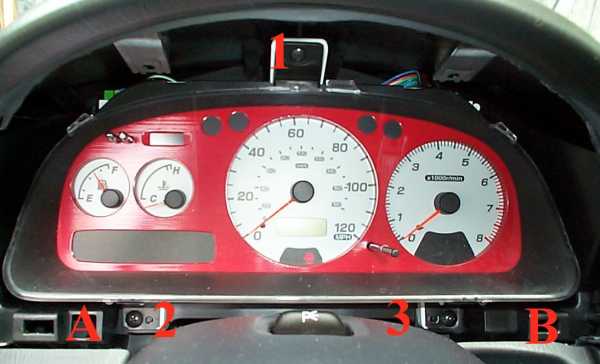
OK in this picture you can see exactly where those tabs were (spots A and B). The next three screws to be removed are labelled 1, 2, and 3. After removing these three screws, the whole gauge housing will be free from the dash. It's still attached by the wiring harness, but you can flip the whole package flat on its back, to access the clips holding the plastic cover on. You need to remove the plastic cover in order to have enough room to get the inner cowl housing out of the dash later on. |

|
In this picture, you will see the placement of the first two of the seven clips holding the plastic cover on (spots A and B). You will not be able to see all seven clips, so you need to pop these bottom two off, and then proceed around to the other five. You will need to be careful pulling the plastic out of the dash- don't scratch anything. Also, be careful not to bend or snap the + and - buttons for the clock, or the trip meter reset. With a little manipulation, it will come out easily. The next picture shows the plastic cover off, and the locations of all of the tabs. |


|
In this picture, you will see the first two of six tabs holding the inner cowling on (labelled A and B). The next picture will show the placement of all six of these tabs (this picture is from the backside, but you get the idea- unlike the plastic cover, they are symmetrically placed). Carefully pop these six tabs off, and the inner cowl will come right off. Again, you will need to futz with it a bit to get it out of the dash, just be careful not to scratch the dash or the cowling. |


|
OK, here it is, the home stretch for the dismantling operation. At this point, there is nothing holding the gauge face to the gauges themselves, so all you need to do is gently pull up where the gauge face meets the white gauge housing, and it will come off. It's very easy to tell where to pull, just be gentle, as the + and - buttons as well as the reset for the trip meter pass through the gauge face. From here on out, you need only paint your gauge face and reassemble your dash. Make sure you give the gauge face a light sanding and then wipe it down with a tack cloth or lint free towel before you paint it, to help the paint stick and keep the finish smooth. Follow the paint manufacturer's directions, and you'll ensure a nice finish. All you need to do then is reassemble your dash, and you're ready to go. |