Installing Morettes
 |
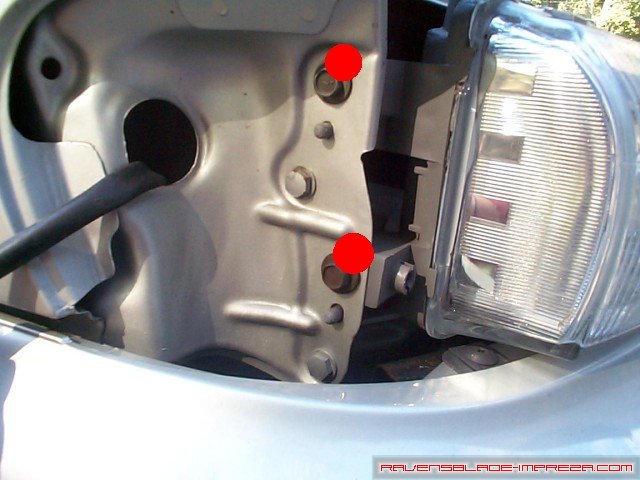
Ok, it's time to get things started. Start by popping the hood, and disconnecting your battery- the last thing you need to do is blow out a headlight relay in the process of doing this swap. Next thing to do is to remove your grill. There are two small openings in the tops of the grill, marked by the two red dots in the picture. Push down into these with a screwdriver gently, and the grill should pull towards you and pop right off. |

 |
Move over to the corner marker of the car. There is a small screw in each one that connects it to the headlamp housing- remove this screw. |
|
This is VERY hard to see, as well as a bad photograph, but there is a small plug and socket on the bottom of the corner marker- this is most of what holds it in once you have the screw removed. GENTLY pull towards the front of the car, parallel with the ground, and this should pop right out. Be careful to not snap the tab off that the screw went through. |
|
With the corner marker out, turn the bulb connector counterclockwise about 1/3 turn, and it will come right out. Set your corner marker aside for later. |

|
Next, in the area where the corner marker was, you will find 2 10mm bolts. Remove both of these. |
|
Behind where the grill was, you will find 2 more 10mm bolts that you will also need to remove. Ignore the oil cooler in the picture. |

|
The only thing left to do is to remove the connector for the headlamp bulb. Push in where the two red dots are and wiggle the connector, and it should pop off of the bulb. You can now remove the whole headlamp assembly. Repeat these first steps for the driver side headlamp, and then grab your new Morette lamps. |

|
On the very end of the Morette housing, you will find two bolts, each one with 2 nuts and 2 washers on it. Remove only the outer nut and the 2 washers, and place the Morette housing in the headlight opening. |
|
Just before you slide the bolts through the metal bracket, place one of the flat washers back on each bolt. Removing them until now lessens the chance of loosing them into the bumper beam. Slide the flat washers on, and then push the bolts through. |

|
Now, place the domed washer on the bolts, and replace the nuts (these are 8mm nuts). Do not tighten them down fully, only enough to keep them from moving around too much- you will need to adjust them later. |

|
With the end bolted in, replace the two bolts in the grill area. |

|
Lastly, plug the stock headlamp connector back in. |

|
On the passenger side Morette, there is a pair of wires. These need to be directed towards the driver side headlamp. I opted to push these between the frame and the radiator. |

|
This is just a better picture of the pair of wires to which I was reffering before. You can see how they connect to the leader wire from the driver side Morette housing more clearly. Now is the time to connect them, as the leader wire is only just about long enough to reach across. Get the driver side housing, run the leader between the radiator and the frame, and connect these wires together now, while you have plenty of slack. |

|
There is a row of small holes in the bumper beam that you can easily see with the grill off. I placed the leader wire under the beam, and used zip ties to tuck it up neatly. |

|
This photo shows the mess of wires found on the back of the driver side Morette housing. The bundle on the left is the leader wire you just ran between the headlamps, as well as the + wire to the battery (this is the wire with the 15amp fuse inline). The green item is a relay, which switches on the H2 bulbs when you turn on the high beams. Everything else is detailed below. |

|
There are two taps, one is gray, one is blue. These need to be tapped into the stock headlamp wiring on the driver side. The brown wire runs to the negative (-) terminal on the battery, and the black wire with the fuse runs to the positive (+) terminal. |

|
As you start making all the electrical connections, I suggest you do not "install" the driver side Morette yet- just leave it loose and hold it up with your legs to give you more room to make the connections. Here is where it gets interesting, and this is the worst photo I've ever taken I think (I'm taking donations for a close up lens for the camera). The instructions state that the Blue Tap goes to "A" and the Gray Tap to "B" on the headlamp harness diagram in the instructions. However, we have the big black rubber "boot" over the connector, so you cannot tell which wire is which. If you have a 2000 RS, be thankful as the boot is a pain in the tail to get off so you can see which wire is what, and harder to get back on. If you have a 2000 RS (and it may be similar for other models, I'm just not sure) the Blue Tap goes to the solid red wire on the harness, and the Gray Tap on the red wire with a blue stripe. |

|
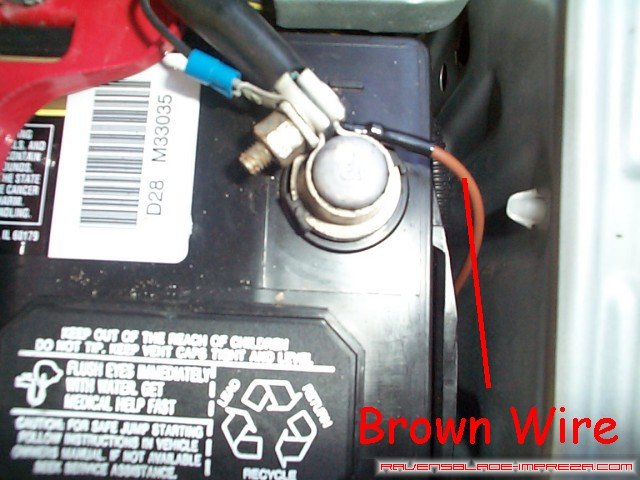
This photo shows how I ran the brown wire around the battery and up to the negative terminal. |
|
This photo shows where I connected the black wire with the inline fuse- there is a small distribution block towards the back of the connector. |

|
With all your connections made, push the driver side headlamp in, and secure it loosely, just like you did for the passenger side. Plug the stock headlamp connector back onto the new bulb in the Morette. Now it is time to even out the headlamps. I did not take any photos of this step, as it is intuitive. Basically, place your grill loosely between the new Morettes (ie: do not clip it back in) and slide the Morette housings around until the reveal between the housings and the grill is level and even. When it is, tighten down the bolts that are in the grill area, not the outside edge by the corner marker. This will ensure the reveal stays even. With that done to both housings, replace your grill. Now you can tighten down the nuts on the ends of the housings, and then replace the corner markers. |

|
The Morette headlamps come with their own screws for the corner marker, as well as a small metal bracket (these should already be attached when you get your lamps, and are marked with the red dot). Use this bracket/screw, not the ones you removed when you started the whole project. |

|
Remember the plug you had to tug on when removing the corner markers? This is the eqivalent socket on the Morette. You will have to push HARD to get the corner marker back in, but it will go. The Morettes seem to hold the corner marker even more snugly than the stock setup did. Replace the screw that holds the corner marker in once you get it to pop into this socket. |

|
The completed headlamp with the corner marker reinstalled. |

|
The equivalent done on the driver side. |

|
This photo and the next several photos are different views of the headlamps as partially or fully installed on the car. Enjoy! |

|
Adjusting Your Morette Headlights. Now that you have the headlamps installed, you will probably want to adjust them to an effective pattern (mine were heavily out of alignment upon arrival, as is to be expected with a transoceanic trip from France). The picture below should help give you an idea of what to do- it is of the passenger side lamp as viewed from behind. The driver side lamp will be a mirror image of it. |


|
H2 High Beam: The H2 high beam only lamp is the inboard lamp, closest to the grill. This lamp is adjusted by means of three bolts- I have marked them 1 and 2 in the picture. A combination of tightening/loosening the bolts labelled 1 will give you your left/right adjustment. Tightening the bolt on the right will push the beam left and vice versa. The bolt labelled 2 in the picture is for up/down. Tightening this bolt will make the beam rise, while loosening it allows the beam to dip. |

|
H4 High/Low Beam: This is the outside beam of the two- the one closest to the corner marker. It is the one the stock wiring clipped into. This one is adjusted via two white wingnuts and one bolt. This one adjusts in the same manner as the high beam only lamp- the wingnuts (labelled with a 3) give you right/left adjustment, while the bolt labelled 4 is used to adjust your height. |
|
This is just a quick table of current light output of the Morettes, with only the stock 55/60 watt bulbs- they will be upgraded to 80/100 bulbs in short order. Had I thought of it, I would have taken photos of the stock headlamp light output, but I did not. |