DIY Clear Corner Modification
 |
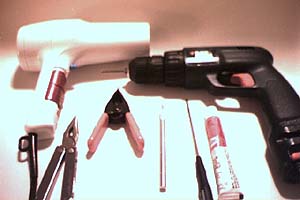
Tools Required This is a picture of the tools you will need to perform this modification. A hairdryer, drill, needle-nose pliers, screwdrivers, xacto knife, model glue, A Macintosh Case Cracker or flat clamp. For all you techs out there (I know there are a lot of you...) the Mac case cracker will be easy to find - If not pick up a spring clamp at the hardware store. This is going to help us carefully get the lens apart. |
 |
Making your front corner lenses clear. This little modification has been successfully repeated a number of times, and I have added even more tips then what's been floating around the Internet. The front clear side markers can be purchased for around $100 if you buy them, so this is a money saver. Before attempting this - understand that you may crack the lens! I take NO responsibility for what you do to your car. The clear lens is standard on the WRX - this is a good start to future WRX style upgrades. Take the hairdryer, and start heating up the edges of the lens. It's held together with very sticky rubber goo, and little clips. You don't need to worry about the little clips if you heat the plastic up enough. Heat until you can't directly touch the edge without burning yourself. Then with the case cracker start to SLOWLY pull apart the clear lens from the housing. |

|
Careful... Only work on the TOP and BOTTOM of the lens! The outer edges, and the sides crack too easily. It will come apart, but It's going to take you 15 minutes the first time. Once separated, clean up the goo with your fingers. Fold the excess back into the housing. |

|
You thought that was hard? Now it's time for the hard stuff. Prepare a drill with a tiny (as small as you can find) drill bit. Get your knife and pliers ready. If you take a good look, you will see that the orange lens is raised above the clear lens, and glued in. The 2mm edge around the orange lens is what we will be attacking. |

|
Drill small holes 1mm deep in the four corners of the orange lens. Once done, this will allow you to crack the edge of the orange lens with the needle-nose pliers. Before you start though, get your hairdryer ready again. |
|
You'll get little chunks of orange plastic that look like this. Once you get your first piece off, you'll understand where this is going. Make sure to grab only the orange edge with your pliers. It's two different types of plastic - you can tell. |

|
You will have to get every last piece of orange edge off, before she'll break loose. Then, when you have one little piece left to grab, the orange lens will come off in your hand. Victory! |

|
You will probably have tiny little pieces of orange left on the edges where you were cracking. The xacto knife helps to scrape those little buggers off. If you are serious about this mod, use a Dremmel to sand the orange off. If you made a crack in the lens, apply a thin layer of clear model glue on the inside to prevent the crack from spreading. Let this dry, and continue. |

|
Remove the metal backing plate. This plate is held in by two small philips head screws. Remove this plate to expose the chrome below! Heat up the two sides for as long as you heated them up to separate them. Start from the outside edge, and quickly mash the two pieces back together. |

|
Finished! They look so much cooler! They cost €100 less, and YOU DID IT! The factory bulbs may need to be changed - for the desired colour. The bulbs on my 1999 glow orange compared to the halogen headlights. They also have been reported to have a blue tint to them. I performed this mod in 2 hours, and that included documenting the process. I only made a very small crack in one of the lenses. |
|
It's tricky sometimes to get the lens out. Here are some hints and a few pics. There is a ball type socket that holds it in after youve removed the screw on the tab. The socket is on the car and the ball is on the You'll have to give a good tug towards the front of the car to get it out. Use your fingernails to grab on each side and while standing in front of the car tug towards yourself. But be careful not to pull so hard and move the lens too far it will snap of the tab that the screw was in. It's very tricky the first time. It almost feels like you are going to break something. Take notice how flush the lens is to the headlamp glass before you take it off. It should be like that when you put it back on too. I've seen a lot of people with the lens not flush. All it takes is a good pop with the heel of your hand to get it back flush again. That ball and socket is pretty tight a good wack will seat it again. |

